 |
V6 Calibra |
|
|
|
V6 Calibra |
|
|
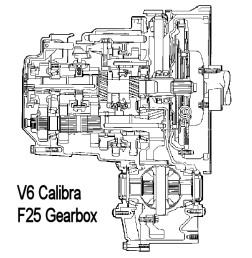
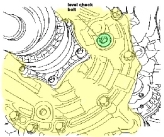
The V6 F25 is located on the right hand end (as looking at front of vehicle) of the transversely mounted C25XE engine. It can be seen better when the alternator cooling fan + ducting and power steering fluid reservoir are removed.
Changing the clutch on the F25 is more difficult than other calibra models due to the pot shaped flywheel. The gearbox housing must be separated away from the engine bell housing by more than 1" to gain proper access to change out the clutch assembly.
The F25 is considered a poor choice for the C25XE due to its lazy, long gearing and heavy flywheel. There is a lot of truth to this which is why a lightened flywheel and F28 six speed gearbox (converted to 2WD mode) are a popular V6 modification. This really transforms the driving characteristics of the V6 and can best be described as more 'lively'. At the very least, if your V6 clutch has gone consider it an opportunity to change out the heavy flywheel for a new lighter aftermarket version. You won't regret it, the engine revs a lot more freely.
The F25 is still an OK gearbox. It is reliable and good for 150,000 + miles. Once you get used to the long gearing and learn to rev the V6 hard, it's not so bad. It's also rated to 250 bhp so easy handles most of the demonstrated performance mods (cams, large throttle body, etc). Third gear is good for up to 110 mph so leaving it in third to get you up to 70-80 is the way to do it; after all, the V6 engine really sings at high revs.
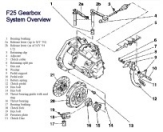
F25 : System Overview
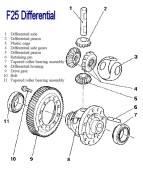
F25 : Differential
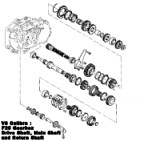
F25 : drive shaft, main
shaft & return shaft
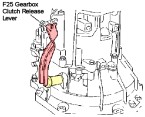
F25 : clutch release lever
If you are having problems changing gears on your V6 then consider following some of the procedures described below before you assume that the clutch is on the way out (try in this order - check/adjust clutch, check gearbox fluid level, check/adjust gear linkage).
However, there are some clear indicators when then clutch is going. One sign is a whirring noise which disappears when you lift the clutch pedal up with your foot.
Before Gearbox Fluid Top Up & Clutch Adjust .........
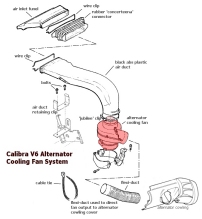
When you require access to the top of the gearbox (for clutch adjust and gearbox fluid fill) you will find it easier to remove the alternator ducting and mini blower, the PAS reservoir and optionally the battery. The engine relay box should also be removed if you need to replace the clutch cable. These are all straightforward to remove and doing so will make some gearbox jobs a lot easier.
alternator air cooling system
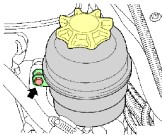
single bolt retains PAS bottle
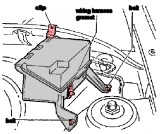
two bolts, a clip & cable grommet
to remove the engine bay relay box
Gearbox Oil Level Check
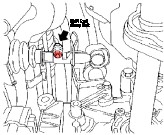
Jack up the vehicle and work from underneath. Remove the F25 gearbox oil level check bolt (torx bolt). This is situated on the back of the F25 housing. You will need an extension to reach it. It is above the front axle which will obstruct access.
With the bolt removed a small amount of transmission fluid should trickle out. The correct level is to the base of the level check bolt hole.
view from under car - rear of gearboxIf you need to top up the gearbox oil you must do so through the top up bolt hole. This is situated on top of the F25 gearbox housing and best accessed from above. You will find it much easier if you first unbolt the power steering fluid reservoir and move it out of the way. Once you have clear access, remove the torx bolt and carefully top up the fluid through the bolt hole. Use a small funnel to avoid spillage. Top up until fluid dribbles from the level check hole. If you want to replace the gearbox oil then use a hand pump and hose tool to extract the old oil through the fluid level check hose.
1.8 to 1.9 litres of new hydraulic transmission oil will be required to refill (2 x part no : 90 540 998) (SAE-80)
On late V6 F25 gearboxes there is a bottom drain bolt which can be removed to drain the gearbox.When replacing both bolts, tighten to 50 Nm torque (37 ft/llbs)
view from top, with power steering reservoir
removed - gearbox level fill bolt hole
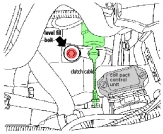
Adjusting the clutch / replacing clutch cable
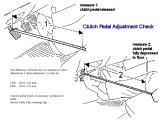
Check the clutch pedal travel range and position to determine the correct setting of the clutch cable adjuster. The clutch pedal position will change with
normal clutch wear over time.
Adjusting the clutch cable is part of normal maintenanceThe clutch cable is adjusted at the gearbox end. It's difficult to see the clutch adjuster from above. It is obscured beneath the power steering reservoir, just behind and underneath the battery tray. You will need to reach underneath and feel with your fingers. The adjuster retains the cable to the clutch release lever. Pull the cable towards you and push the lever away slightly. The adjuster and cable should just lift out to the side.
(see Before Gearbox Fluid Top Up & Clutch Adjust .......).
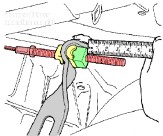
It is a good idea to make a note of the original clutch cable position before you start to make any adjustments. Remove the clutch cable and retainer from the arm, adjust and replace. Wind the adjuster in (leaving more thread hanging out of the end) in order to lift the clutch pedal higher. Let the adjuster out (less thread showing at the end) to drop the clutch pedal position lower to the floor.To replace the clutch cable you need to detach it from the cable adjuster at the gearbox end. Next detach the clutch cable from the retaining bracket behind the clutch pedal from underneath the vehicle. Now feed the old cable trough the engine bay. Note that the is a rubber grommet where the cable is routed through the engine bay bulkhead.
NOTE: Late model V6's use a slightly longer clutch cable. "T" chassis variants and later require the longer clutch cable.
Adjusting the gearstick/gearbox linkage
Step One
Working from underneath the vehicle, loosen the shift rod clamp bolt
In order to gain better access : Remove alternator cooling ducts - upper and lower (to alternator cooling cowling). Remove the bracket for the top flat cooling duct as it will stick in your arm as you are trying to access the clutch cable adjuster. Remove the small alternator cooling fan unit. It is also a good idea to remove the bolt holding the power steering fluid reservoir and move the reservoir out of the way and also the battery
(see Before Gearbox Fluid Top Up & Clutch Adjust .......)..
Step Two
Extract the plug bolt from the adjuster hole (replace with new one after you have finished). Use a screwdriver or 4 mm old drill bit and insert into the adjuster hole while jiggling/rotating anticlockwise with the gear adjuster tube. Turn it to the left. Eventually the drill bit will engage with the selector hole. This will hold it.
Step Three
Inside the car - unclip the gearstick surround cover and peel back out of the way of the base. This gives you access to the gearstick linkage. Tilt gearstick until holes align (see right). Insert something into the holes to lock in place.
Step Four
Finally, back underneath the vehicle, retighten the shift rod clamp bolt. Remove locking tools from gearbox and gearstick. Replace (or use new) adjustment bore plug.
Test operation of all gears.## NOTE : It is recommended that you use a new plug bolt (90578997) as this seal at the top of the F25 gearbox is vital. A Vaux technical bulletin was issued (Exxxxxxxx) describing:
F25 equipped vehicles travelling at high speed will have foaming transmission oil. The foaming gearbox oil will egress through the gearshift alignment pin hole; unless the hole is properly sealed and protected. The original part was modified in 1996 to include an extra 'O' ring on the bolt (90578997).
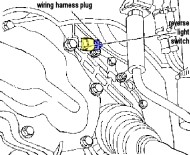
Reverse gear switch (for reverse light)
Reverse light switch and connector. Replace by removing connector and unscrewing from gearbox housing. Use new washer/ring seal and tighten to 20 Nm torque
view through passenger
front wheel arch
(RHD models)